5 Web application concepts
In this chapter, we discuss about the fundamental concepts underlying web applications, like the client-server model, the HTTP protocol and web servers, showing how Shiny integrates that system and what are the differences with the classic web standards. This chapter may significantly ease the understanding of part 3.
5.1 The client-server model
A Shiny app is a web application and like all web applications, it follows the server-client model which consists in:
- A client which sends requests to the server through the network.
- A server composed of hardware and software elements that treats the client request.
- A network inside which flow requests between the server and the client. It is done with the HyperText Transfer protocol (HTTP).
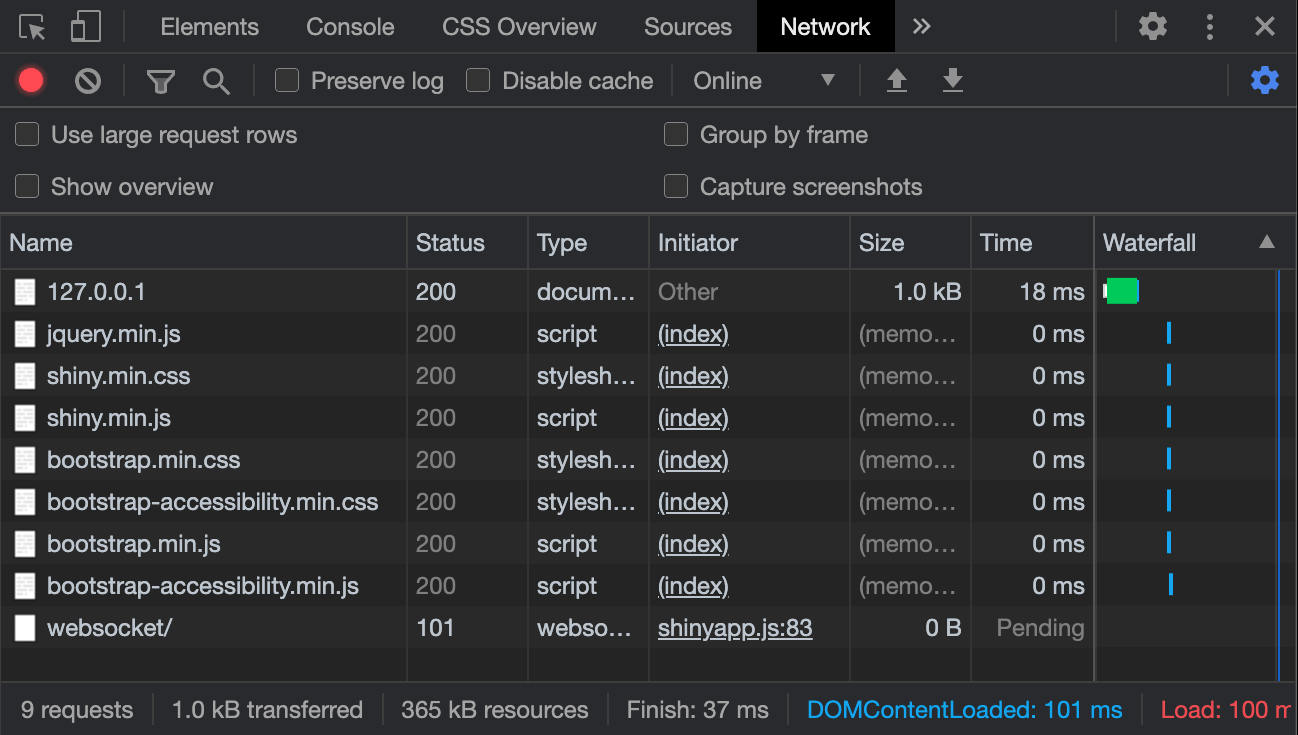
Each time a client sends a request, it is processed by the server, which provides an answer and closes the connection, before treating any other request. In practice, to get a web page, the client emits many requests, one to get the page and then one request per JS/CSS/image assets. As an example, try to run the following in the R console and open the developer tools:
Under the network tab, we notice many files (if nothing is shown, reload the web browser tab), which actually correspond to all requests made by the client to the server, Figure 5.1. We also get the current answer status, 200 being the OK HTTP status, the size and the time needed to treat the request. Nowadays, there exists mechanisms like web browser caching to speed up the request treatment. Don’t believe that each time you visit a shiny app, all requests are answered by the server. Actually, most assets are recovered from the web browser cache, that takes significantly less time, although sometimes misleading. I am sure you already found this situation when, after updating your shiny app style, you still get the old design. Most of the time this is a caching issue and resetting Chrome’s cache solves the problem.

FIGURE 5.1: Request flow between client and server at shiny app start.
5.2 About HTTP requests
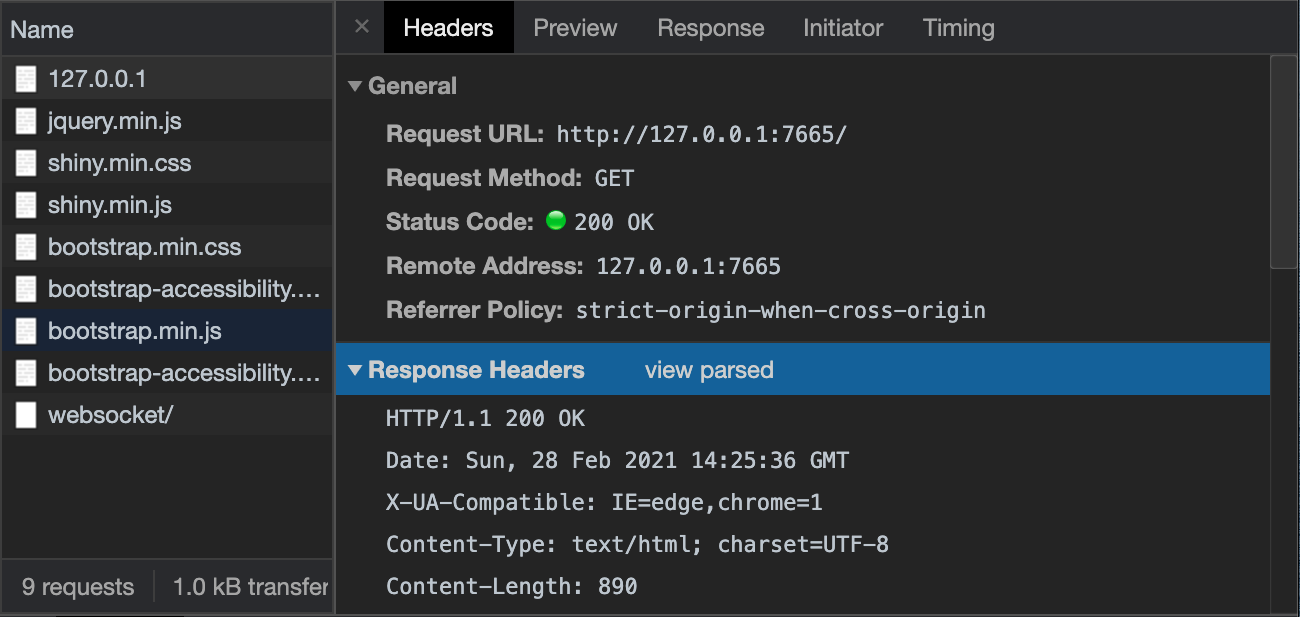
If we inspect the first request from Figure 5.1, we obtain Figure 5.2. An HTTP request is composed of:
- A method that indicates the intentions.
We mostly use
GETto ask for something orPOST, to submit something. - An url, corresponding to the path to the targeted element. Here, if nothing is specified in the path, the server will try to get the main HTML page, also called
index.html.

FIGURE 5.2: Details about an HTTP request.
The HTTP protocol is unidirectional, that is, you may see it as a phone call during which you are only allowed one question, thereby terminating the call.
httr (Wickham 2020) allows to do most of the HTTP request directly from R like:
5.3 Structure of an URL
The url (uniform resource locator) defines the unique location of the content to access on the server. The general structure is the following:
<PROTOCOL>://<HOST>:<PORT>/<PATH>?<QUERY>#<ANCHOR>PROTOCOL or (scheme) is the communication protocol, that is HTTP or HTTPS (encrypted HTTP). HOST is an IP adress or a domain name, that may be bought. For instance google.com is an owned domain name. The PORT indicates which program to use to access the specified resources (80 and 443 are the default HTTP and HTTPS values, respectively). PATH is the location of the resource on the server. For instance, if you run the above basic Shiny app and enter http://127.0.0.1:<PORT>/shared/jquery.min.js (replace PORT by your own value), you’ll see the jQuery.min.js code, that is actually needed by Shiny. QUERY is the place where to add extra parameters, following the key/value notation like ?key1=value1&.... In a Shiny app, query parameters may be retrieved with parseQueryString() or altered by updateQueryString().
5.4 Web app files structure
There are substantial differences between Shiny and classic web applications regarding the project file structure.
While web applications are composed of at least an index.html file, as well as optional
pages and assets (extra CSS and JS files, images), we don’t exactly find such a file structure in Shiny.
A basic Shiny app folder is mostly composed of:
- app.R or ui.R/server.R
- A www folder containing assets like JS, CSS, images.
Where is the index.html file? It is actually created on the fly when you run shinyApp(). The detailed processes are
mentioned later in this chapter.
5.5 Serving web apps
In order to expose our app to the rest of the world, we have to host is somewhere, that is a web server. A server actually corresponds to:
- A hardware layer, namely the machine or virtual machine able to run programs. Most of servers are running under Linux. It is actually pretty straightforward to set up your own server thanks to the many solutions like digitalocean or the amazon web service, also known as (AWS).
- A software layer, that are programs necessary to treat the client requests. You probably know Apache or nginx, that are the most common solutions.
How is a Shiny app served? In the Shiny context, we need a software able to run R scripts, thereby preventing us from relying on classic hosting strategies. RStudio developed multiple solutions, the most famous is likely shiny server:
- Shiny server open source.
- Shiny server pro.
- RStudio Connect.
- shinyapps.io.
You can see Shiny server as an improved web server. Indeed, in addition to run Rmd documents (R markdown) or shiny apps, it is able to interpret classic HTML files. An excellent guide developed by Dean Attali to set up your own server is available here.
Another noticeable difference between web servers and shiny server is the running port, which default to 3838 for the latter (instead of the classic 80), although entirely customizable through the configuration file.
5.6 About {httpuv}
In addition to the shiny server layer, that is able to run R code and start any app on the server as a result of a user request, Shiny relies on httpuv (Cheng and Chang 2021) which fires a web server for each app directly from R, making it possible to handle HTTP requests but also the R and JS communication, that will be covered later in chapter 11.
5.7 Shiny app lifecycle
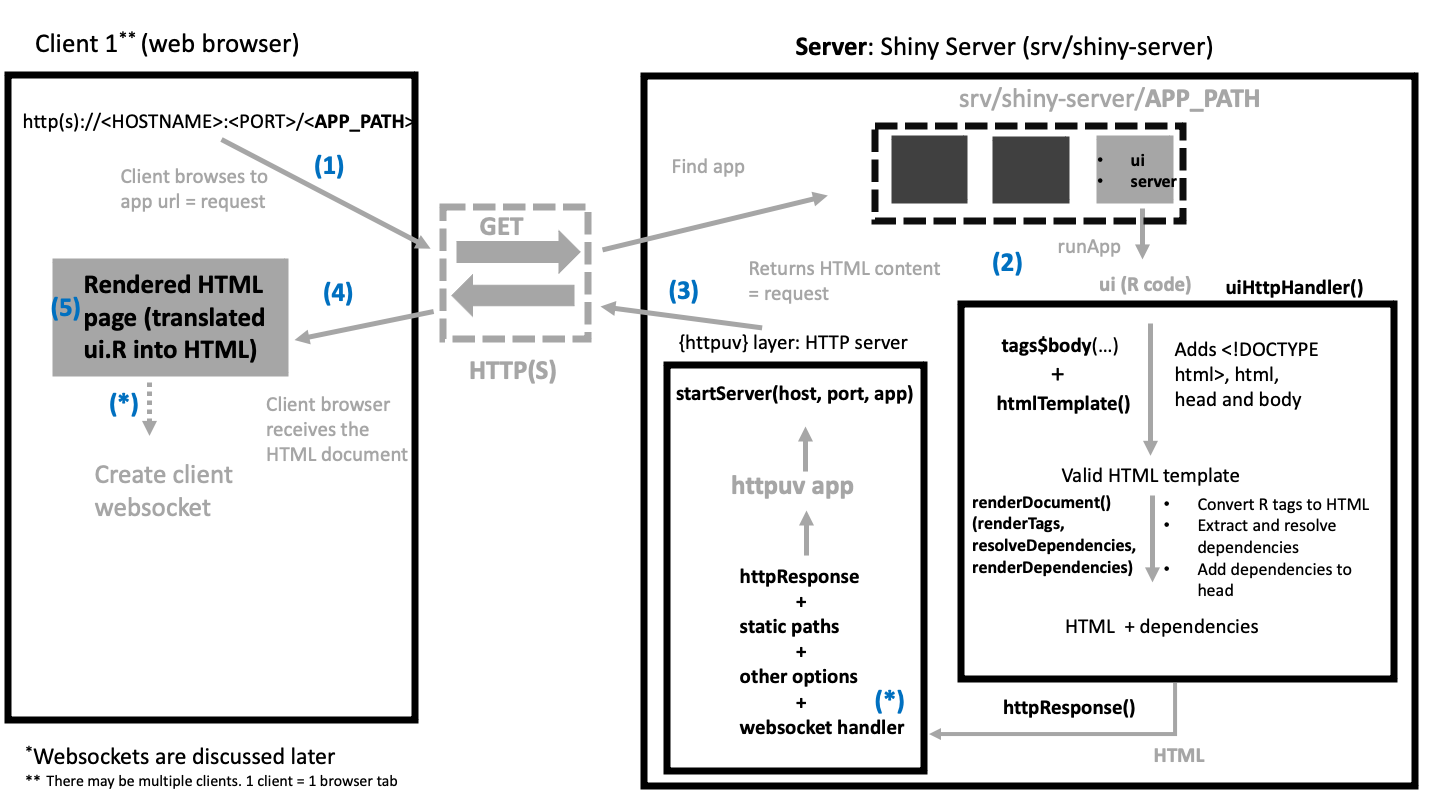
Whenever a user (client) accesses a shiny app with his web browser, a series of events occurs (Figure 5.3):
- The client sends a HTTP
CONNECTrequest to the server (Shiny server) containing the path to the targeted app. - The shiny server starts the targeted app with
runApp().
Under the hood, runApp():
- Calls
shinyApp()that returns a shiny app object composed of a server function and the UI. The UI has to be formatted to be a function returning an HTTP response, as requested by httpuv. Section 5.7.1 explains this process in details. - Calls
startAppthat creates HTTP and websocket (WS) handlers. WS handlers are responsible for controlling the WS behavior when the app starts, when a message is received from a client and when the app closes. WS are necessary to allow communication between R and JS, as shown in Chapter 11. - Calls
startServerfrom httpuv, that starts the HTTP server and opens the server websocket connection.
- If the R code does not contain errors, the server returns the Shiny UI HTML code to the client.
- The HTML code is received and interpreted by the client web browser.
- The HTML page is rendered. It is an exact mirror of the initially provided
ui.Rcode.

FIGURE 5.3: Shiny App lifecycle.
The returned HTML contains all the necessary JavaScript to subsequently open the client websocket connection and start the dialog between R and JS. This will be discussed in Chapter 11.
5.7.1 Building the UI
As stated above in 5.4, the Shiny app file structure does not follow all the web development standards. Particularly, there is no index.html file.
What definitely makes Shiny wonderful is the ability to only write R code to produce HTML. Although convenient for R users, there is a moment where all this R code has to become HTML, since web browsers are just not able to process R files.
Shiny must provide a string containing the HTML code that will be later given to the httpuv server and displayed to the end user, if the request is successful. Moreover, it must be a valid HTML template, as shown in chapter 1.3.3, which is not the case when you use top level UI shiny function like fluidPage():
#> <div class="container-fluid">
#>   <p></p>
#> </div>
In the above output, we miss the <!DOCTYPE html> indicating to the web browser that our
document is HTML and load the appropriate interpreter. Additionally, html, head and body are not
provided with fluidPage().
How does Shiny create an appropriate HTML template? These steps heavily relies on htmltools, particularly the renderDocument() function. If this has not been documented in chapter 2, it’s mainly because it is, in theory, quite unlikely you’ll ever use those functions, unless you try to develop another web framework for R, built on top of httpuv, like {ambriorix} or {fiery}. Another use case is {argonR} which allows to design Bootstrap 4 HTML templates, on top of the argon design system.
Under the hood, shinyApp() does many things, particularly creating a valid HTTP response template for httpuv, through the internal shiny:::uiHttpHandler function.2 The conversion from R to HTML is achieved by shiny:::renderPage. First, the provided UI R code is wrapped in a tags$body(), if not yet done. As a reminder fluidPage does not create a body tag, which is required to produce a valid HTML template. The result is given to htmlTemplate() to fill the following boilerplate, part of the Shiny package:
<!DOCTYPE html>
<html{{ if (isTRUE(nzchar(lang)))
  paste0(" lang="", lang, """) }}>
  <head>
  {{ headContent() }}
  </head>
  {{ body }}
</html>
If we assume that our UI is built as follows, applying htmlTemplate() on it yields:
ui <- fluidPage(
  textInput("caption", "Caption", "Data Summary"),
  verbatimTextOutput("value")
)

ui <- htmlTemplate(
  system.file("template", "default.html", package = "shiny"),
  lang = "en",
  body = tags$body(ui),
  document_ = TRUE
)
The output is shown below (body content is cropped for space reasons):
<!DOCTYPE html>
<html lang="en">
  <head>
    <!-- HEAD_CONTENT -->
  </head>
  <body>
    <div class="container-fluid">
      <!-- Body content -->
    </div>
  </body>
</html>
You may wonder what headContent() does. It inserts the string <!-- HEAD_CONTENT --> inside the head tag so that
shiny knows where to insert the dependencies, that is all mandatory JS and CSS assets. Then, all necessary dependencies like jQuery, Bootstrap and shiny css/javascript files (shiny:::shinyDependencies) are added in the UI head by renderDocument(). renderDocument() is a three steps process:
- Convert all R shiny tags to HTML with
renderTags(). For each tag,renderTags()returns a list of four elements: the head content, any singletons, the list of dependencies and the HTML string. - Treat the dependencies with
resolveDependencies()to remove conflicts, as shown in Chapter 4.4. - Process the dependencies with
createWebDependency(), which make sure each dependency can be served over HTTP. - Convert dependencies R code to HTML with
renderDependencies()and insert it in the templatehead, replacing the<!-- HEAD_CONTENT -->string.
For instance, we call renderTags() on the shiny icon():
library(htmltools)
res <- renderTags(icon("cogs"))
str(res)
#> List of 4
#> $ head : 'html' chr ""
#> ..- attr(*, "html")= logi TRUE
#> $ singletons : chr(0)
#> $ dependencies:List of 1
#> ..$ :List of 9
#> .. ..$ name : chr "font-awesome"
#> .. ..$ version : chr "5.13.0"
#> .. ..$ src :List of 1
#> .. .. ..$ file: chr "/Users/davidgranjon/David/CRC-book/outstanding-shiny-ui/renv/library/R-4.0/x86_64-apple-darwin17.0/shiny/www/sh"| __truncated__
#> .. ..$ meta : NULL
#> .. ..$ script : NULL
#> .. ..$ stylesheet: chr [1:2] "css/all.min.css" "css/v4-shims.min.css"
#> .. ..$ head : NULL
#> .. ..$ attachment: NULL
#> .. ..$ all_files : logi TRUE
#> .. ..- attr(*, "class")= chr "html_dependency"
#> $ html : 'html' chr "<i class=\"fa fa-cogs\" role=\"presentation\" aria-label=\"cogs icon\"></i>"
#> ..- attr(*, "html")= logi TRUEand then renderDependencies() on the tag dependency:
renderDependencies(res$dependencies)#> <link href="/Users/davidgranjon/David/CRC-book/outstanding-shiny-ui/renv/library/R-4.0/x86_64-apple-darwin17.0/shiny/www/shared/fontawesome/css/all.min.css" rel="stylesheet" />
#> <link href="/Users/davidgranjon/David/CRC-book/outstanding-shiny-ui/renv/library/R-4.0/x86_64-apple-darwin17.0/shiny/www/shared/fontawesome/css/v4-shims.min.css" rel="stylesheet" />Let’s apply renderDocument() to our previous template:
html <- renderDocument(
  ui,
  deps = c(
    list(
      htmlDependency(
        "jquery",
        "3.5.1",
        c(href = "shared"),
        script = "jquery.min.js"
      )
    ),
    shiny:::shinyDependencies() # Shiny JS + CSS
  ),
  processDep = createWebDependency
)
The final HTML output is shown below (body content is cropped to save space).
Look at the head tag where all dependencies are correctly inserted.
<!DOCTYPE html>
<html lang="en">
  <head>
    <meta http-equiv="Content-Type" content="text/html;
    charset=utf-8"/>
    <script type="application/shiny-singletons"></script>
    <script type="application/html-dependencies">jquery[3.5.1];
    shiny-css[1.6.0];shiny-javascript[1.6.0];
    bootstrap[3.4.1]</script>
    <script src="shared/jquery.min.js"></script>
    <link href="shared/shiny.min.css" rel="stylesheet" />
    <script src="shared/shiny.min.js"></script>
    <meta name="viewport" content="width=device-width,
    initial-scale=1" />
    <link href="shared/bootstrap/css/bootstrap.min.css"
    rel="stylesheet" />
    <link href="shared/bootstrap/accessibility/css/
    bootstrap-accessibility.min.css" rel="stylesheet" />
    <script src="shared/bootstrap/js/bootstrap.min.js"></script>
    <script src="shared/bootstrap/accessibility/js
    /bootstrap-accessibility.min.js"></script>
  </head>
  <body>
    <div class="container-fluid">
      <!-- Body content -->
    </div>
  </body>
</html>
The final step is to return an HTTP response containing the HTML string. As of shiny 1.6.0, the httpResponse function is exported by default and the retuned content is exactly the same as showed above:
httpResponse(
  status = 200,
  content = enc2utf8(paste(collapse = "\n", html))
)
#> $status
#> [1] 200
#>
#> $content_type
#> [1] "text/html; charset=UTF-8"
#>
#> $content
#> [1] "<!DOCTYPE html>\n<html lang=\"en\">\n<head>\n <meta http-equiv=\"Content-Type\" content=\"text/html; charset=utf-8\"/>\n <script type=\"application/shiny-singletons\"></script>\n <script type=\"application/html-dependencies\">jquery[3.5.1];shiny-css[1.6.0];shiny-javascript[1.6.0];bootstrap[3.4.1]</script>\n<script src=\"shared/jquery.min.js\"></script>\n<link href=\"shared/shiny.min.css\" rel=\"stylesheet\" />\n<script src=\"shared/shiny.js\"></script>\n<meta name=\"viewport\" content=\"width=device-width, initial-scale=1\" />\n<link href=\"shared/bootstrap/css/bootstrap.min.css\" rel=\"stylesheet\" />\n<link href=\"shared/bootstrap/accessibility/css/bootstrap-accessibility.min.css\" rel=\"stylesheet\" />\n<script src=\"shared/bootstrap/js/bootstrap.min.js\"></script>\n<script src=\"shared/bootstrap/accessibility/js/bootstrap-accessibility.min.js\"></script>\n</head>\n<body>\n <div class=\"container-fluid\">\n <div class=\"form-group shiny-input-container\">\n <label class=\"control-label\" id=\"caption-label\" for=\"caption\">Caption</label>\n <input id=\"caption\" type=\"text\" class=\"form-control\" value=\"Data Summary\"/>\n </div>\n <pre class=\"shiny-text-output noplaceholder\" id=\"value\"></pre>\n </div>\n</body>\n</html>\n"
#>
#> $headers
#> $headers$`X-UA-Compatible`
#> [1] "IE=edge,chrome=1"
#>
#>
#> attr(,"class")
#> [1] "httpResponse"
5.7.2 Serving HTML with {httpuv}
Once the UI is processed, Shiny makes it available to end users by leveraging httpuv, which provides tools to set up an HTTP server. The main function is startServer that requires a host, port and an app. If you run a shiny app locally, the default host is localhost or 127.0.0.1 and the port is randomly chosen by shinyApp or runApp, even though you may fix it. The most important element is the app and httpuv expects a list of functions like:
-
call, to handle the client HTTP request and return the server HTTP response. Depending on the context, Shiny may return different responses like 403 (unauthorized), 404 (not found) or 200 (OK). -
onHeadersif the request contains headers. For instance, this may be required for authentication. -
staticPathsto serve assets, especially CSS or JS files.
A valid call function template containing the previously processed HTML UI is defined below:
app <- list()
app$call <- function(req) {
  list(
    status = 200L,
    headers = list(
      'Content-Type' = 'text/html'
    ),
    body = html
  )
}
We then invoke startServer:
library(httpuv)
s <- startServer(
  "127.0.0.1",
  8080,
  app
)
Now, if we browse to 127.0.0.1:8080, we see the text input. However, opening the HTML inspector shows many errors, most of them due to the fact that we forgot to serve static assets, all located in the inst/www/shared folder of the shiny package. Let’s do it below by adding a staticPaths component to our app:
s$stop() # stop the server before running it again!
app$staticPaths <- list(shared = system.file(
  package = "shiny",
  "www",
  "shared"
))
s <- startServer(
  "127.0.0.1",
  8080,
  app
)
The response may be inspecting directly from R (ideally within another R session) with an httr GET request:
GET("http://127.0.0.1:8080")

## Response [http://127.0.0.1:8080]
##  Date: 2021-03-04 23:41
##  Status: 200
##  Content-Type: text/html
##  Size: 5 B
Keep in mind that Shiny does much more things to setup the server and we just highlighted the most important steps. The above code crashes since the HTML page returned to the client tries to connect to a server websocket, that does not yet exist.